Ford Mustang Distributor Restoration and Replacement
Your Ford Mustang distributor is the perfect first restoration project.
With a few tools and a couple of hours you can make one of the most
important parts of your engine look and perform like new, with a
distributor rebuild.
And if you only want to learn how to replace an old, worn or defective distributor, in your classic car, you'll find that here too.
Here's my beautiful unrestored 1965 Ford Mustang Coupe, with custom rust and an ahem... non stoc, previous owner applied candy apply red engine treatment.
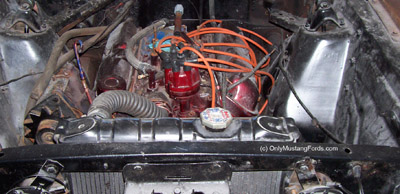
Yep, a real beauty. As you can also see, there's a lot of work to be done to both, the engine and engine bay before this old pony car sees the light of day.
Ford Engine Distributor Location
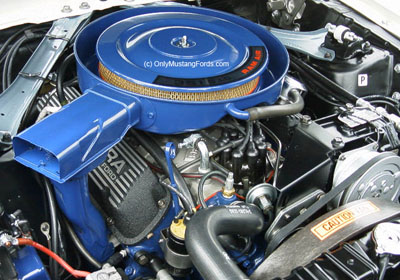
The Ford Mustang distributor on both the small block V8 engines, such as the 260, 289, 302 and 351 V8 engines are all located at the front of the engine blocks.
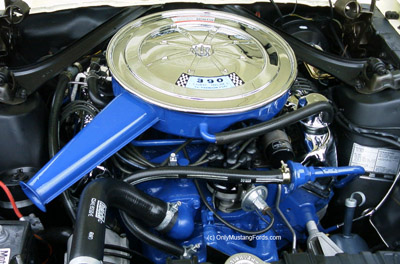
As well, the Big block Ford Mustang distributor such as the 390 cubic inch V8 seen on this 1967 GT390, and the 428 Cobrajet is also located near the front by the water outlet.
Distributor Removal - Good Running Engine
If you own a running car and just want to restore or detail your engine's distributor, you'll need to remove it from the engine to simplify the job and prevent harsh chemicals from touching other parts of the engine or under hood areas.
Tools and Materials Required
1. can of Brake cleaner or other degreaser/solvent
2. wire brush
3. Assortment of Open/closed end wrenches
4. Slot head screwdriver
5. Scotchbrite pad or steel wool
6. feeler gauges (for setting point gap if replacing points)
7. 1/2 inch masking tape
8. ball point pen or sharpie
9. Assembly lube or STP
10. phone with camera or digital camera
Step 1: Mark Rotor and Distributor body alignment
Start by grabbing a good sharp tool, such as a scratch awl and scribe a small line across the bottom of the distributor housing as seen in the picture below.
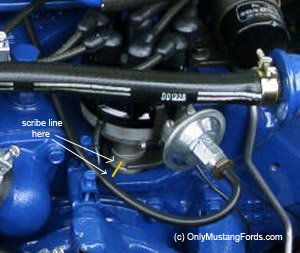
Scratching this line into the housing base as well as the corresponding edge of the intake manifold casting will allow you to remove the distributor for cleaning up and restoring, while preserving the engine timing that you now have.
Then mark, or take a picture of the unit still attached to note exactly how it sits when bolted in as well as which direction the pointy contact end of the rotor points.
The position of these two things, make it possible to complete the process without needing to reset your engine's spark timing.
<b>Important:</b> while it's even easier to draw a line with a felt pen or sharpie, it's almost impossible to properly clean up your old distributor housing and not remove even a line made by a permanent marker.
Step 2: Remove your Ford Mustang Distributor Wires
Keeping things as simple as possible for re-installation, one by one, remove and mark the distributor wires showing which terminal it goes onto in the distributor cap.
(For extra insurance, you might even want to take a quick digital picture with your phone or camera to make sure it all goes back together the way it came off.)
Step 3: Remove the hold down bolt and bracket
Secure these parts in a safe place such as a zipper bag for later use and then pull the distributor assembly out with a slight twisting motion.
Place it directly onto a suitable work surface such as a piece of wood, cardboard or a work bench.
Step 4: Remove Components
Carefully remove the Mustang distributor cap with a screwdriver and set it aside. If it's even only a couple of years old, it's time to replace it and the rotor below it, that's attached to the distributor shaft.
If you are also replacing the points and condenser, then remove them using a screwdriver. If you're not sure about how they go back, it's a good idea to take another picture for future reference. If you do decide to remove them, chances are, you will have to then, re-set your point's gap according to the specs from your pony car's repair manual.
Later cars, with electronic ignition, or early cars changed to electronic control are even easier. In this case, you can simply leave it all there and continue on cleaning up the exterior of your distributor, or remove the pieces without worrying about anything more than one gap measurement if they are adjustable.
Finally remove the two screws holding the vacuum advance unit to the side of the distributor body and pull it out of the rectangular hole.
Step 5: Distributor Restoration
Once all the pieces have been removed it's time to renew your distributor housing. If your unit is like mine, there's some ugly paint to remove along with the grease, which means a treatment of paint stripper.
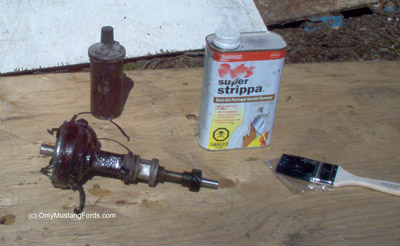
Carefully brush the paint stripper onto the body of the unit (wearing goggles and rubber gloves) and allow it to bubble up the old nasty paint. Then brush the loosened paint off with a stiff wire brush. Don't use a metal scraper. It will only leave deep scratch marks that are almost impossible to remove.
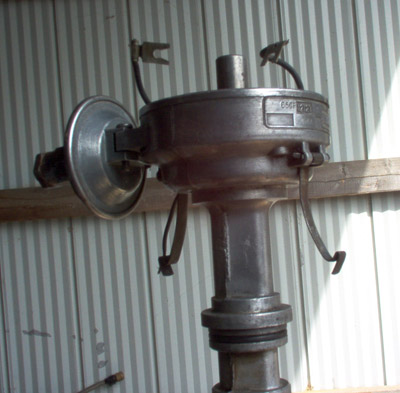
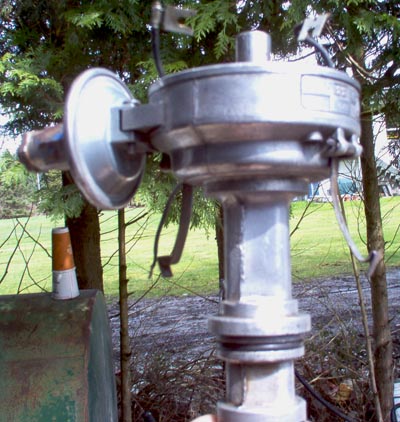
In most cases, all you need to do now, is use your scotch brite pad or some fine steel wool to bring up the casting to a nice matte finish. Or if stock isn't your thing, you're ready to get out the aluminum polish and buffer wheel and make that thing shine!
Step 6: Reassembly
Using your pictures, scratch marks and tape, reassemble the unit and get it ready for installation into your Ford Mustang's engine.
Step 7: Install
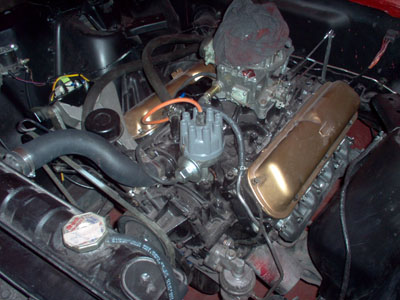
Place a small amount of assembly lube onto the distributor gear and around the O-ring that seals the unit to the intake manifold body and carefully slide the shaft and gear back into the hole, meshing the Ford Mustang distributor's teeth with the gear inside the engine.
The two areas that need to line up to get the engine running right away are the base marks and the position of the rotor on the top of the assembly.
This should be easy since you only have to line up the scratch marks on the outside of the assembly casting and line up the new rotor as you marked it or photographed it.
Once in place, simply reattach the hold down bracket and bolt.
Then, clip or bolt your new distributor cap onto the unit and reattach the ignition wires according to the tags you made prior to dis assembly.
Double check your work and you're done!
Distributor Removal - Non Running Motor
If you are rebuilding
your engine or have a unit already out of the car, it's even simpler to
restore your Ford Mustang distributor since you know that later the
ignition system will have to be timed.
Ignition wires already attached? Follow step 2 above to make reattachment faster.
Step 1b: Remove the Unit
Unbolt the hold down bolt, removing it and the hold down bracket and place them into a secure container or bag for safe-keeping.
Step 2b: Remove Components
Remove the distributor cap, rotor and if necessary, points and condenser and vacuum advance unit.
Step 3b: Degrease and Remove Paint
See step 5 above.
Step 4b: Distributor Restoration
See step 5 above
Step 6b: Reassembly
Carefully
reattach the Ford Mustang distributor's vacuum advance unit, points and condenser (if removed) and
rotor onto their respective areas. Don't attach the distributor cap yet
except for keeping the dust out of the housing. You'll need to have
access to the electronics inside and the location of the rotor when
attached to the distributor shaft to get things lined up when timing
your engine.
That's it. You're done. Easy wasn't it?
Other Mustang Restoration Projects
Part 1 - Mustang RestorationPart 2 -Resurfacing Minor Irregularities
Part 3 - Rear quarter panel repairs
Part 4 - Inner Fender Refinishing and Repair
Part 5 - Mustang floor pan replacement
Part 6 - Floor Pan Replacement Continued
Part 7 - Headliner Replacement
Part 7A - Mustang Headliner replacement part 2
Part 8 - Mustang Dash Restoration
Part 9 - Trunk rust repair
Part 10 - Priming and Painting your Mustang Part-1
Part 11 - Gas Tank Restoration
Part 12 - Color Sanding
Part 13 - Mustang gas tank Installation
Part 14 - Mustang gas tank Restoration
Part 15 - Valve Cover Restoration
Part 16 - Distributor Restoration
See the main list above for short, simple to do projects such as air cleaner and valve cover restoration, or replacement and restoration of your front and rear brakes.
Return from Ford Mustang distributor restoration to Ford Mustang